
Painting home interiors and exteriors stands as one of the most impactful and budget-friendly ways to transform your living space. Whether you're refreshing a single room or tackling an entire house makeover, the right approach to painting can breathe new life into tired walls, update outdated color schemes, and reflect your evolving personal style. This comprehensive guide will walk you through every aspect of painting home spaces, from initial planning and color selection to execution and finishing touches, ensuring your project delivers professional results that you'll love for years to come.
Planning Your Painting Home Project
Before you pick up a single brush, successful painting home projects require thoughtful planning and preparation. Start by assessing the scope of your project and determining which areas need attention most urgently. Walk through your home with a critical eye, noting peeling paint, discoloration, or simply rooms that no longer reflect your aesthetic preferences.
Create a realistic timeline that accounts for preparation, painting, and drying time. Most rooms require at least two to three days when factoring in proper prep work and multiple coats. Consider seasonal factors too, especially for exterior projects where temperature and humidity play crucial roles in paint adhesion and drying.
Budget Considerations and Material Selection
Establishing a clear budget helps guide your material choices and project scope. Quality paint costs more upfront but typically covers better, lasts longer, and requires fewer coats, ultimately saving money and time.
Essential materials include:
- Premium paint (calculate 1 gallon per 400 square feet)
- Primer for bare surfaces or dramatic color changes
- Brushes (2-3 inch angled for cutting in)
- Roller frames and covers (3/8 inch nap for smooth surfaces, 3/4 inch for textured)
- Painter's tape and drop cloths
- Sandpaper and spackle for repairs
- Paint trays and liners
When painting home interiors, invest in low-VOC or zero-VOC paints that minimize harmful emissions and odors. These environmentally friendly options have improved dramatically in recent years, offering excellent coverage without compromising indoor air quality.
Choosing Colors That Transform Your Space
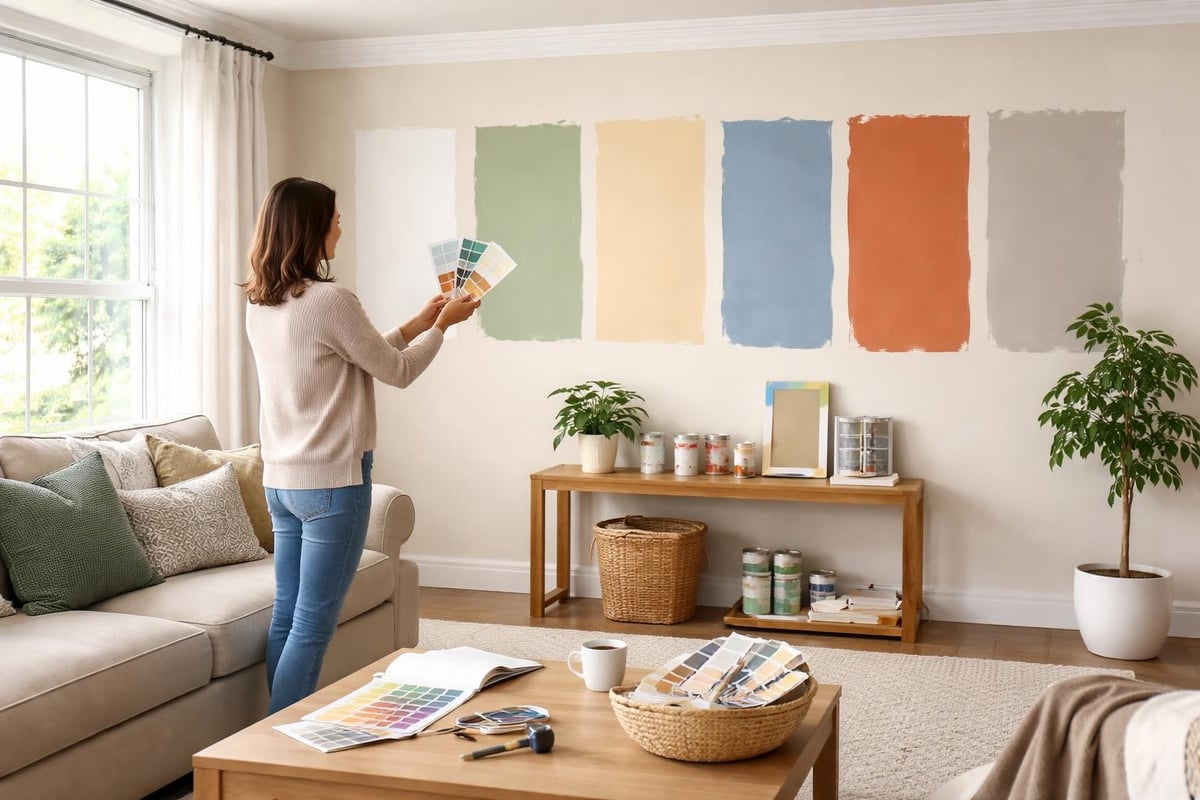
Color selection represents the most exciting yet challenging aspect of painting home projects. The right colors can make rooms feel larger, cozier, brighter, or more sophisticated, while poor choices can create regret that lasts until the next repaint.
Understanding Color Psychology and Room Function
Different colors evoke specific emotional responses and work better in certain spaces. Cool blues and greens promote calmness and work beautifully in bedrooms and bathrooms. Warm yellows and oranges energize spaces and suit kitchens and dining areas. Neutral grays, beiges, and whites provide versatile backdrops that accommodate changing decor styles.
Consider how natural and artificial light affects color appearance throughout the day. Paint large sample squares (at least 2×2 feet) on different walls and observe them during morning, afternoon, and evening hours before committing to full room coverage.
| Room Type | Recommended Colors | Effect |
|---|---|---|
| Bedrooms | Soft blues, lavenders, warm grays | Promotes relaxation and restful sleep |
| Kitchens | Whites, warm yellows, sage green | Creates clean, energetic atmosphere |
| Living Rooms | Neutral tans, soft grays, muted colors | Versatile backdrop for gathering |
| Home Offices | Greens, blues, light grays | Enhances focus and productivity |
| Bathrooms | Whites, aquas, spa-like blues | Clean, refreshing feel |
For those seeking inspiration beyond traditional wall colors, explore the creative ideas at Decoratehow’s decoration guides for complementary design elements.
Surface Preparation: The Foundation of Success
Professional painters often say that 80% of a quality paint job lies in the preparation. Cutting corners during prep work inevitably shows in the final results, leading to poor adhesion, visible imperfections, and shortened paint life.
Step-by-Step Surface Preparation
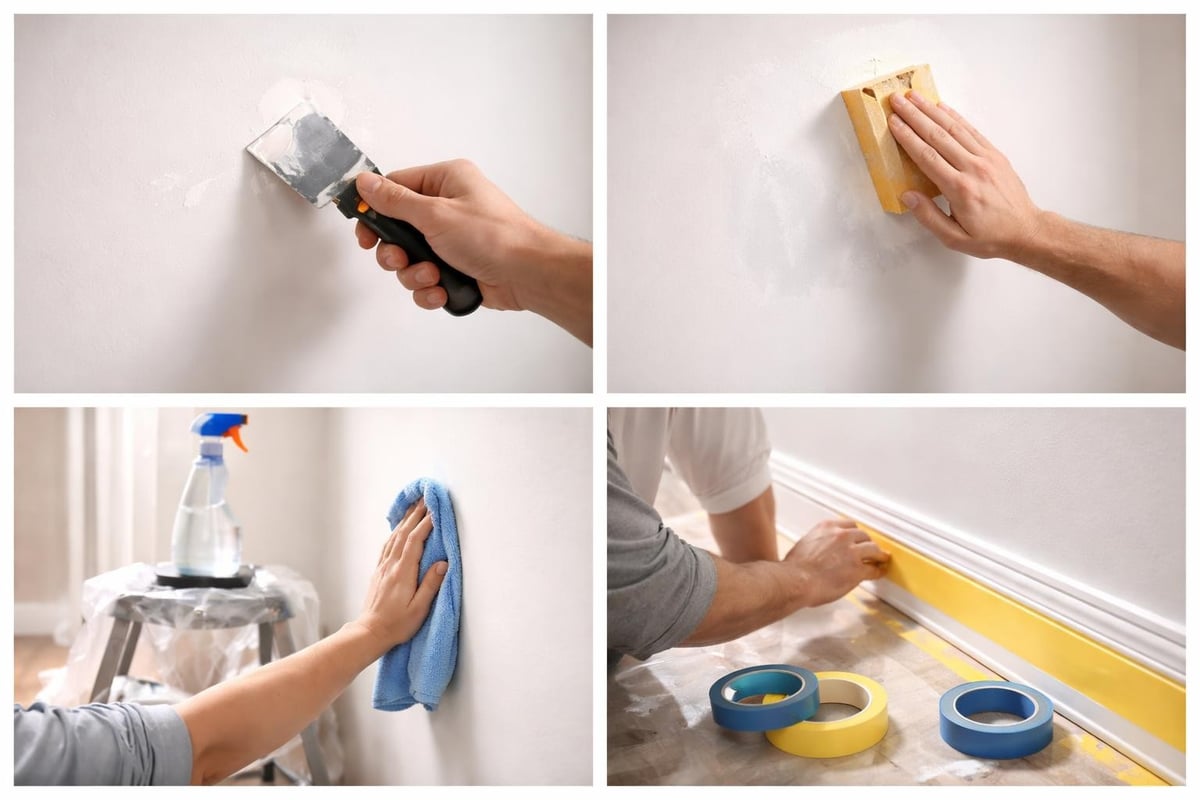
- Clear the room completely or move furniture to the center and cover with drop cloths
- Remove outlet covers, switch plates, and hardware for clean lines
- Clean walls thoroughly with TSP solution or mild detergent to remove dirt and grease
- Repair damage by filling holes and cracks with spackle, allowing to dry completely
- Sand repaired areas and glossy surfaces to create tooth for paint adhesion
- Apply painter's tape along trim, ceilings, and edges for crisp lines
- Prime bare surfaces, repairs, and dramatic color changes for optimal coverage
When painting home exteriors, surface preparation becomes even more critical. Pressure washing removes dirt and mildew, while scraping eliminates loose or peeling paint. The exterior painting guidelines emphasize avoiding common mistakes that compromise long-term durability.
Safety should never be an afterthought when painting home spaces. Ensure adequate ventilation, wear appropriate protective equipment, and follow essential safety precautions to protect yourself and your family throughout the project.
Painting Techniques for Professional Results
The actual painting process requires patience, proper technique, and attention to detail. Rushing through this phase wastes all the careful planning and preparation you've invested.
Cutting In and Rolling
Cutting in means painting the edges and corners where rollers can't reach. Use a high-quality angled brush loaded with paint (not dripping). Maintain a steady hand and create a 2-3 inch border around all edges, working in sections small enough to keep a wet edge.
Rolling technique determines the final texture and coverage. Load your roller evenly, avoiding excess drips. Use a "W" or "M" pattern to distribute paint, then fill in without lifting the roller. Maintain consistent pressure and overlap each section slightly.
Apply thin, even coats rather than one thick coat. Two thin coats provide better coverage, more even color, and superior durability compared to a single heavy application. Allow proper drying time between coats as specified by the manufacturer.
Common Application Mistakes to Avoid
- Overloading brushes and rollers, causing drips and uneven texture
- Painting in extreme temperatures (below 50°F or above 90°F)
- Skipping second coats to save time, resulting in thin coverage
- Removing tape too early or too late, causing paint peeling
- Insufficient ventilation, prolonging drying and creating health risks
Interior designers recommend being selective about what you paint, as outlined in this guide about things to never paint in your home, which can save you from costly mistakes.
Tackling Different Surfaces and Finishes
Painting home projects often involve various surfaces that each require specific approaches and paint types. Understanding these differences ensures appropriate product selection and application methods.
Wall Types and Paint Sheens
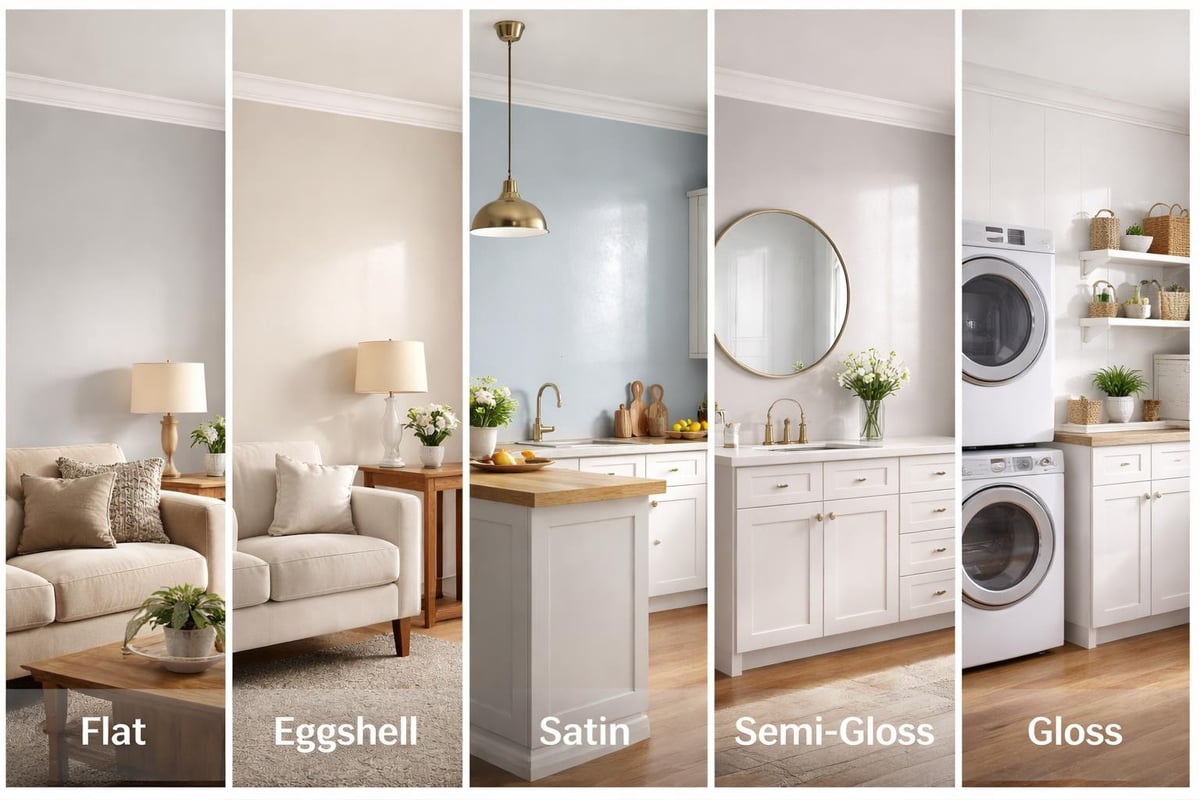
Different wall surfaces and their intended use dictate the appropriate paint sheen:
Flat/Matte finishes hide imperfections beautifully but mark and scuff easily, making them ideal for low-traffic areas and ceilings. Eggshell finishes offer subtle luster with better washability for living rooms and bedrooms. Satin finishes provide durability for high-traffic areas, hallways, and children's rooms. Semi-gloss and gloss finishes resist moisture and clean easily, perfect for kitchens, bathrooms, and trim.
Special Considerations for Trim, Doors, and Cabinets
Trim work demands extra precision when painting home interiors. Use painter's tape strategically and invest in quality angled brushes for clean lines. Sand between coats for ultra-smooth finishes on doors and cabinets.
Cabinet painting requires specific primers and paints designed for adhesion to previously finished surfaces. Consider professional-grade products and extended drying times between coats for kitchen and bathroom cabinetry that withstands daily use.
Exterior Painting Considerations
Painting home exteriors presents unique challenges compared to interior projects. Weather resistance, surface materials, and environmental conditions all influence product selection and timing.
Timing and Weather Conditions
Exterior painting requires dry conditions and moderate temperatures. Plan projects during stable weather periods, avoiding rain forecasts for at least 24-48 hours before and after painting. Early fall and late spring typically offer ideal conditions in most regions.
The general guidelines for painting exterior surfaces provide comprehensive technical information for achieving durable, long-lasting results.
Material-Specific Approaches
Different exterior materials require tailored approaches:
- Wood siding: Prime bare wood, use acrylic latex for breathability
- Vinyl siding: Use vinyl-safe paints to prevent warping
- Brick and stucco: Apply masonry primer before topcoats
- Metal surfaces: Use rust-inhibiting primers and specialty paints
Proper surface preparation becomes even more critical outdoors where elements constantly challenge paint integrity. Power washing, scraping, and priming create the foundation for paint that withstands seasons of exposure.
Maximizing Your Paint Investment
Quality painting home projects involve managing resources wisely and planning for future needs. Strategic approaches to paint purchase, application, and storage extend your investment's value.
Calculating Paint Quantities Accurately
Measure room dimensions carefully, calculating total square footage minus windows and doors. Most paint covers approximately 400 square feet per gallon, but textured surfaces and porous materials require more. Purchase 10-15% extra to account for touch-ups and future repairs.
Keep detailed records of paint brands, colors, and finish types used in each room. This information proves invaluable for future touch-ups and coordinates with the house decoration ideas you'll want to implement later.
Storing and Reusing Leftover Paint
Proper storage preserves leftover paint for years. Pour remaining paint into clean containers, filling them nearly full to minimize air exposure. Label each container with the color name, room used, and date. Store in temperature-controlled areas away from freezing and extreme heat.
Discover creative ways to use leftover paint through these innovative repurposing ideas that prevent waste and inspire new projects.
Advanced Techniques for Creative Effects
Once you've mastered basic painting home techniques, explore decorative approaches that add personality and visual interest to your spaces.
Accent Walls and Color Blocking
Create focal points by painting home accent walls in complementary or contrasting colors. Choose walls with architectural interest or those you want to emphasize, such as behind beds or fireplaces. Color blocking uses geometric patterns and multiple colors to create modern, artistic statements.
Textured and Specialty Finishes
Experiment with techniques beyond solid colors:
- Rag rolling creates subtle texture and depth
- Sponging adds organic, natural patterns
- Strié (dragging) produces elegant, fabric-like finishes
- Stenciling incorporates patterns and designs without wallpaper
- Ombré blends colors from dark to light
These advanced approaches require practice and patience but deliver unique results that showcase your creativity and skill.
Maintaining Your Freshly Painted Spaces
Protecting your painting home investment requires ongoing care and maintenance. Establish routines that preserve paint quality and appearance for years.
Regular dusting and occasional gentle cleaning with mild soap remove dirt before it becomes embedded. Address marks and scuffs promptly with leftover paint and a small brush. Avoid harsh chemicals and abrasive cleaners that damage paint finishes.
Touch up high-traffic areas annually to maintain fresh appearance. Keep small amounts of each room's paint accessible for quick repairs. Consider full repainting every 5-7 years for interiors and 7-10 years for exteriors, depending on quality and conditions.
Seasonal Painting Projects and Maintenance
Different seasons offer unique opportunities and challenges for painting home projects. Spring and fall provide optimal conditions for most painting, while summer and winter require special considerations.
Spring painting takes advantage of mild temperatures and lower humidity, perfect for opening windows during interior projects. Summer offers long daylight hours but requires early morning or evening work to avoid extreme heat. Fall provides another ideal window before winter, with stable temperatures and low humidity. Winter limits exterior work but allows interior projects when homes are sealed against cold.
Plan touch-ups and maintenance around seasonal needs. Inspect exterior paint after harsh winters and before summer heat. Refresh high-traffic interior areas before holiday gatherings or after long winters spent primarily indoors.
Painting home interiors and exteriors transforms living spaces while building valuable DIY skills that serve you for years to come. By following proper preparation techniques, selecting appropriate materials, and applying paint with patience and precision, you'll achieve professional-quality results that reflect your personal style and enhance your daily environment. Whether you're updating a single accent wall or refreshing your entire home's exterior, Decoratehow offers the inspiration, practical tips, and creative ideas you need to tackle your next painting project with confidence and achieve beautiful results you'll be proud to show off.